Though spare in appearance, LumetaAsset Manager's command-line interface (CLI) is a powerful tool with many of the same capabilities as LumetaAsset Manager's GUI. It also provides some functionality that is not yet available in LumetaAsset Manager's GUI.This section introduces the basic CLI syntax and provides the procedures you are most likely to use.
CLI commands are organized organized in tiered menus. Shown here Below are the commands available on the primary and secondary tiers.
| Expand |
|---|
| title | Click here to view available CLI tiered menus. |
|---|
|
|
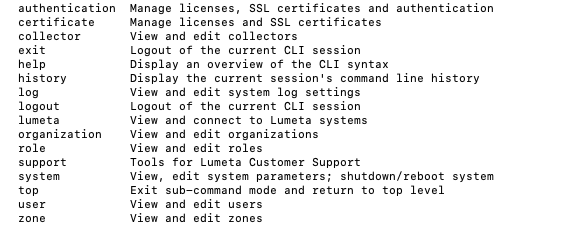 Image Removed Image Removed
| Secondary Tiers of CLI | | authentication | 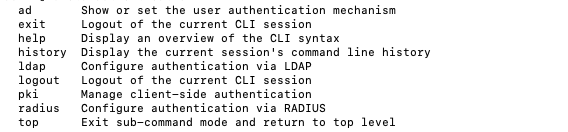 Image Removed Image Removed
|
|---|
certificate
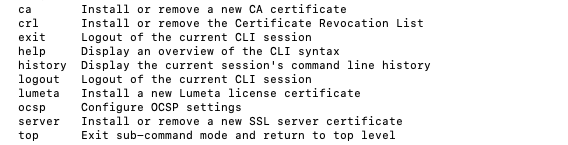 Image Removed Image Removed
| | collector | 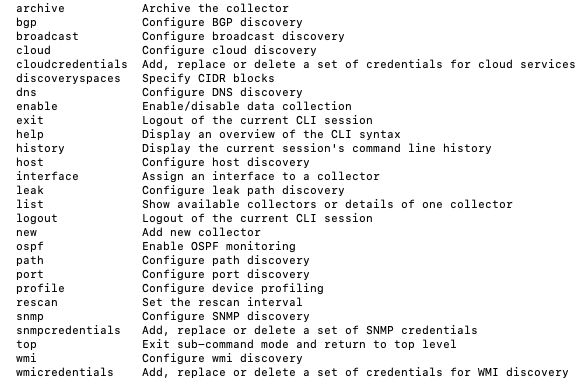 Image Removed Image Removed
|
|---|
| exit |  Image Removed Image Removed
|
|---|
| help | 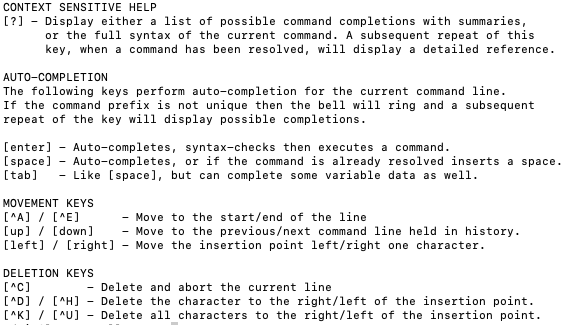 Image Removed Image Removed
|
|---|
| history | 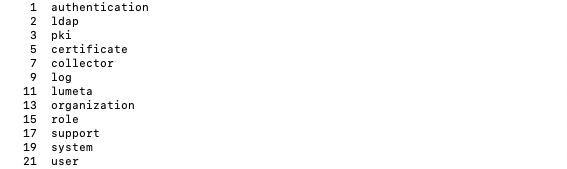 Image Removed Image Removed
|
|---|
log | 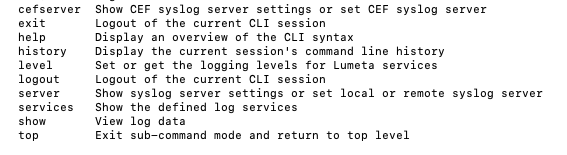 Image Removedtop
| logout |  Image Removed Image Removed
|
|---|
| lumeta | 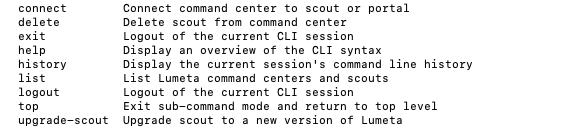 Image Removed Image Removed
|
|---|
| organization | 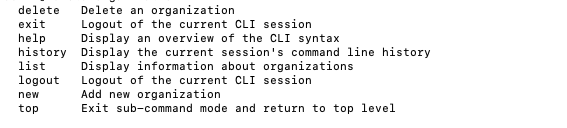 Image Removed Image Removed
|
|---|
| role | 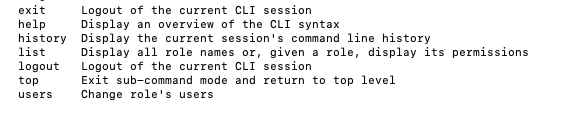 Image Removed Image Removed
|
|---|
| support | 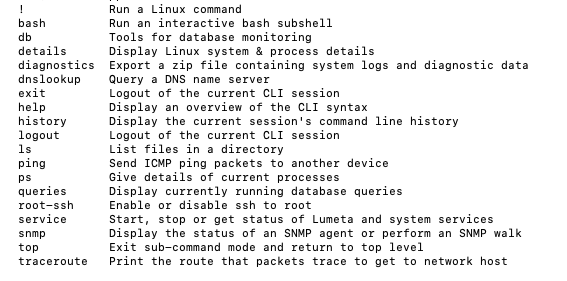 Image Removed Image Removed
|
|---|
| system | 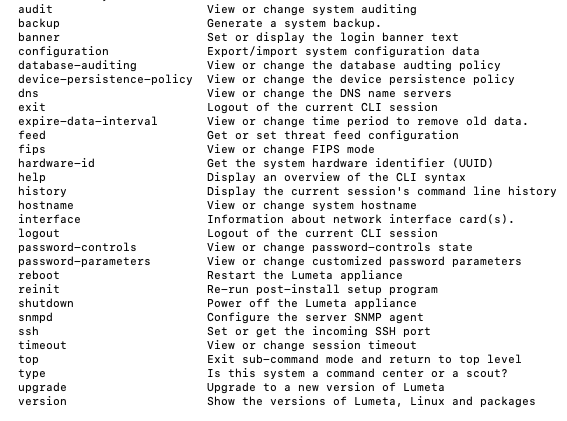 Image Removed Image Removed
|
|---|
| user | 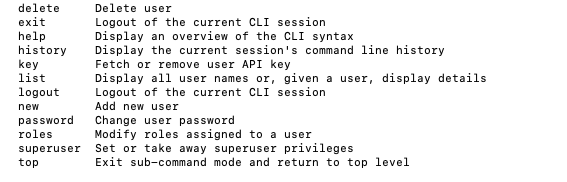 Image Removed Image Removed
|
|---|
zone
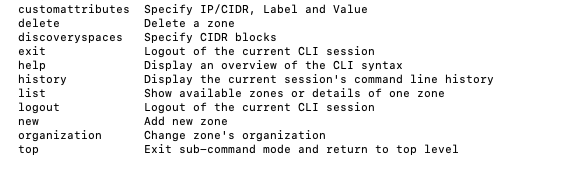 Image Removed
| Purpose |
|---|
| authentication | Manage licenses, SSL certificates and authentication | | certificate | Manage licenses and SSL certificates | | collector | View and edit collectors | | connections | View and connect to Asset Manager systems | | exit | Logout of the current CLI session | | help | Display an overview of the CLI syntax | | history | Display the current session's command line history | | log | View and edit system log settings | | logout | Logout of the current CLI session | | organization | View and edit organizations | | role | View and edit roles | | support | Tools for FireMon Customer Support | | system | View, edit system parameters; shutdown/reboot system | | top | Exit sub-command mode and return to top level | | user | View and edit users | | zone | View and edit zones |
| | Secondary Tiers of CLI |
|---|
| authentication |
| Command | Purpose |
|---|
| ad | Show or set the user authentication mechanism | | exit | Logout of the current CLI session | | help | Display an overview of the CLI syntax | | history | Display the current session's command line history | | ldap | Configure authentication via LDAP | | logout | Logout of the current CLI session | | pki | Manage client-side authentication | | radius | Configure authentication via RADIUS | | top | Exit sub-command mode and return to top level |
|
|---|
certificate
|
| Command | Purpose |
|---|
| ca | Install or remove a new CA certificate | | crl | Install or remove the Certificate Revocation List | | exit | Logout of the current CLI session | | help | Display an overview of the CLI syntax | | history | Display the current session's command line history | | license | Install a new Asset Manager license certificate | | logout | Logout of the current CLI session | | ocsp | Configure OCSP settings | | server | Install or remove a new SSL server certificate | | top | Exit sub-command mode and return to top level |
|
|---|
| connections |
| Command | Purpose |
|---|
| connect | Connect command center to scout or portal | | delete | Delete scout from command center | | exit | Logout of the current CLI session | | help | Display an overview of the CLI syntax | | history | Display the current session's command line history | | list | List Asset Manager command centers and scouts | | logout | Logout of the current CLI session | | top | Exit sub-command mode and return to top level | | upgrade-scout | Upgrade scout to a new version of Asset Manager |
| Info |
|---|
Previous to 4.7, this menu was named "lumeta" |
|
|---|
| exit | Will close and logout of the current CLI session |
|---|
| help | CONTEXT SENSITIVE HELP
[?] - Display either a list of possible command completions with summaries,
or the full syntax of the current command. A subsequent repeat of this
key, when a command has been resolved, will display a detailed reference. AUTO-COMPLETION
The following keys perform auto-completion for the current command line.
If the command prefix is not unique then the bell will ring and a subsequent
repeat of the key will display possible completions. [enter] - Auto-completes, syntax-checks then executes a command.
[space] - Auto-completes, or if the command is already resolved inserts a space.
[tab] - Like [space], but can complete some variable data as well. MOVEMENT KEYS
[^A] / [^E] - Move to the start/end of the line
[up] / [down] - Move to the previous/next command line held in history.
[left] / [right] - Move the insertion point left/right one character. DELETION KEYS
[^C] - Delete and abort the current line
[^D] / [^H] - Delete the character to the right/left of the insertion point.
[^K] / [^U] - Delete all characters to the right/left of the insertion point. |
|---|
| history | Will display the current session's command line history |
|---|
| log |
| Command | Purpose |
|---|
| cefserver | Show CEF syslog server settings or set CEF syslog server | | exit | Logout of the current CLI session | | help | Display an overview of the CLI syntax | | history | Display the current session's command line history | | level | Set or get the logging levels for FAM services | | logout | Logout of the current CLI session | | server | Show syslog server settings or set local or remote syslog server | | services | Show the defined log services | | show | View log data | | top | Exit sub-command mode and return to top level |
|
|---|
| logout | Will close the SSH connection |
|---|
| organization |
| Command | Purpose |
|---|
| delete | Delete an organization | | exit | Logout of the current CLI session | | help | Display an overview of the CLI syntax | | history | Display the current session's command line history | | list | Display information about organizations | | logout | Logout of the current CLI session | | new | Add new organization | | top | Exit sub-command mode and return to top level |
|
|---|
| role |
| Command | Purpose |
|---|
| exit | Logout of the current CLI session | | help | Display an overview of the CLI syntax | | history | Display the current session's command line history | | list | Display all role names or, given a role, display its permissions | | logout | Logout of the current CLI session | | top | Exit sub-command mode and return to top level | | users | Change role's users |
|
|---|
| support |
| Command | Purpose |
|---|
| ! | Run a Linux command | | bash | Run an interactive bash subshell | | db | Tools for database monitoring | | details | Display Linux system & process details | | diagnostics | Export a zip file containing system logs and diagnostic data | | dnslookup | Query a DNS name server | | exit | Logout of the current CLI session | | help | Display an overview of the CLI syntax | | history | Display the current session's command line history | | logout | Logout of the current CLI session | | ls | List files in a directory | | ping | Send ICMP ping packets to another device | | ps | Give details of current processes | | queries | Display currently running database queries | | resize | Extend LVM paritions | | root-ssh | Enable or disable ssh to root | | service | Start, stop or get status of FAM and system services | | snmp | Display the status of an SNMP agent or perform an SNMP walk | | top | Exit sub-command mode and return to top level | | traceroute | Print the route that packets trace to get to network host |
|
|---|
| system |
| Command | Purpose |
|---|
| audit | View or change system auditing | | backup | Generate a system backup | | banner | Set or display the login banner text | | configuration | Export/import system configuration data | | database-auditing | View or change the database auditing policy | | device-persistence-policy | View or change the device persistence policy | | dns | View or change the DNS name servers | | exit | Logout of the current CLI session | | expire-data-interval | View or change time period to remove old data | | feed | Get or set threat feed configuration | | fips | View or change FIPS mode | | hardware-id | Get the system hardware identifier (UUID) | | help | Display an overview of the CLI syntax | | history | Display the current session's command line history | | hostname | View or change system hostname | | interface | Information about network interface card(s). | | logout | Logout of the current CLI session | | ntp | View or change the NTP name servers | | password-controls | View or change password-controls state | | password-parameters | View or change customized password parameters | | reboot | Restart the FAM appliance | | reinit | Re-run post-install setup program | | shutdown | Power off the FAM appliance | | snmpd | Configure the server SNMP agent | | ssh | Set or get the incoming SSH port | | timeout | View or change session timeout | | top | Exit sub-command mode and return to top level | | type | Is this system a command center or a scout? | | upgrade | Upgrade to a new version of FAM | | version | Show the versions of FAM, Linux and packages |
|
|---|
| top | Exit sub-command mode and return to top level |
|---|
| user |
| Command | Purpose |
|---|
| delete | Delete user | | exit | Logout of the current CLI session | | help | Display an overview of the CLI syntax | | history | Display the current session's command line history | | key | Fetch or remove user API key | | list | Display all user names or, given a user, display details | | logout | Logout of the current CLI session | | new | Add new user | | password | Change user password | | roles | Modify roles assigned to a user | | superuser | Set or take away superuser privileges | | top | Exit sub-command mode and return to top level |
|
|---|
zone
|
| Command | Purpose |
|---|
| customattributes | Specify IP/CIDR, Label and Value | | delete | Delete a zone | | discoveryspaces | Specify CIDR blocks | | exit | Logout of the current CLI session | | help | Display an overview of the CLI syntax | | history | Display the current session's command line history | | list | Show available zones or details of one zone | | logout | Logout of the current CLI session | | new | Add new zone | | organization | Change zone's organization | | top | Exit sub-command mode and return to top level |
|
|---|
|
Enabling Netflow NetFlow Capture
To enable NetFlow capture from the Lumeta command-line interface:
- Log in to the CLI.
- At the command-line prompt, enter support service packetcapture start.
- Exit the CLI.
Retrieving Your System's Hardware ID/ Identifying your UUID
The hardware-id command is useful as it displays the information you'll need to supply Lumeta FireMon Support to generate a license. You can also access your hardware ID via the
Lumeta Asset Manager GUI.
- Log in to the CLI.
- At the command-line prompt, enter system hardware-id
The hardware ID displays.
Installing and Activating a License
The The certificate Lumeta command license command in the Lumeta CLI enables you to activate a license or find out the activation date of your current license. Licenses, however, are more frequently activated via the Lumeta browser interface.
If you have a term license that entitles you to use the system for a limited time, Lumeta the system will prompt you to install its key the first time you log in via the CLI. The license counter will begin at that point. You can use the CLI as much as you like; it does not decrement the license counter.
| Info |
|---|
If a command requires a file upload, you have two choices. You can put the file on an SSH server or you can use an SFTP tool like psftp PSFTP or FileZilla to copy the file to Lumeta Asset Manager first. If the file is on an SSH server, then you can refer to it with this syntax: userid@sshserver userid@sshserver:/path/to/file. For example if the file is on a server called "xenon" and you have an account on xenon with the name "alice" and the file is in your home directory and called "license.p12", you can use "alice@xenonalice@xenon:/home/alice/license.p12". certificate lumetalicense install alice@xenonalice@xenon:/home/alice/license.p12 p12 If the file is not on an SSH server, then use SFTP and your Lumeta Asset Manager credentials to copy the file to Lumeta's the /tmp directory. Then you would use this syntax: certificate lumetalicense install /tmp/license.p12 |
- Log in to the CLI.
- If you have a term license, type certificate lumeta license install <loginname@IPaddressloginname@IPaddress:/directory/license_filename> at the command prompt and press Enter (e.gfor example, certificate lumeta asset manager install junebug@10.246.246.159:/users/junebug/Downloads/license.p12.)
- The license installs and you are returned to the command prompt.
- Copy -and paste the UUID to an email message and send it to one of our support teams:
- If you have a free-trial copy of Lumeta, send your UUID to trial_support@lumeta.com.
Otherwise, send your UUID to support@lumetaour support team at support@firemon.com.
In response, Lumeta Support will send you a message containing your license key.- Put the license file you receive from Lumeta Support in a location that can be accessed by SSH.
The following illustrates the syntax to install an Lumeta Asset Manager license via the CLI.
- Provide the location of your license file. In the following screen capture,
admin is the username, Lumeta connections-command-center:Desktop/ is the location of the license file, and license.p12 is the filename of the license. For example: lumeta connections install admin@10.9.0.240:Desktop/license.p12 - Type yes when prompted to continue.
The license file loads and a confirmation message displays.
Enable/Disable Data Retention Policy
- At the CLI command-line prompt, enter system device-persistence-policy for the status.
- At the CLI command-line prompt, enter system device-persistence-policy enable to turn it on.
- At the CLI command-line prompt, enter system device-persistence-policy disable to turn it off
Connecting and Disconnecting Scouts
- At the CLI command-line prompt, enter lumeta connections connect to connect a Command Center to a Scout
- At the CLI command-line prompt, enter lumeta connections delete to delete a Scout connected to the Command Center
Upgrading via CLI
To upgrade to to a new version of LumetaAsset Manager, or to upgrade your Scouts, use the System Upgrade command, the syntax of which is is user@host:path/to/local/file
- At the CLI command-line prompt, enter certificate lumeta license install <user@host:path/to/local/file>
- At the CLI command-line prompt, enter certificate lumeta license install admin@10.9.0.240:Desktop/upgrade5443.tgz
Open the file you receive to execute the upgrade.
Identifying Your Installed Version
The system version Lumeta command is especially useful when working with Support to Identify your release.
Installing Self-Signed Certificates
If a company uses its own certificates, they'll need to make use of the certificate ssl install command:
certificate ssl install friendlyName admin@10.9.0.240:Desktop/copyCert.pem
Identifying Your System ID
To retrieve the full name of a Scout such as spectre32Scout:eth1, which is useful if you don't remember the full name, or want to see the IP address of your system, enter . . .
- system interface list
- Press the Tab key.
The system name and interface ID displays.
Enable/Disable BGP
collector bgp <collector name> enabled [ true | false ]
collector bgp <collector name> peer new <ipaddr> [ enable | disable ] <password> <remote AS>
collector bgp <collector name> peer delete <ipaddr>
Exporting Support Diagnostics
To run the /api/rest/management/system/diagnostic/export API, use the CLI command: support diagnostics file
This command will return a zip file containing:
- system configuration (same as configuration export command)
- contents of /var/log
- system "specs" file (name, uuid, Lumeta version, os version, interface config)
Adding a Superuser
Only a superuser can add or remove another user's superuser status. Multiple superusers are allowed. The last one cannot be deleted.
user superuser <userid> [ true | false ]
Exporting the System Configuration
This command (system configuration export) exports all configuration data to a remote file. To export the configuration and save the file remotely, run:
system configuration export username@hostname:<path to file>
Importing a System Configuration
This command (system configuration import) imports configuration data from a file you've stored locally. To import configuration from the local system, run:
system configuration import <path to file>
Using Special Characters in Names
Most symbols can be entered without any special quoting. If you want to include spaces or double quotes as part of a name, however, care must be taken. To use double quotes, enclose the entire string in double quotes and put a backslash in front of each double quote you wish to be part of the name:
- admin@cc> collector new "before\"after" Zone1 cc:eth0
- admin@cc> collector list
- before"after
To use spaces, you have two choices. Either use a backslash before each space, or enclose the entire name in double quotes:
- admin@cc> collector new with\ space Zone1 cc:eth0
- admin@cc> collector new "two words" Zone1 cc:eth0
- admin@cc> collector list
- two words
- with space
The above is true for passwords, zone names, and organization names, and , with the exception of user names, anywhere you enter a free-form string. User names cannot have special characters.
Asset Manager Components
Use the Interface parameter in the third position to indicate the Lumeta Asset Manager component to which you intend to connect (command-center, portal or scout). In addition, when you connect a command center and portal, you need to supply location information for CC Command Center and can optionally enter a label and icon (avatar).
ON CCFrom Command Center:
lumeta connections connect portal portal_name_or_ip portal cc_lat cc_long [ cc_label [user@host:path/to/cc_icon/file.png ] ]
lumeta connections connect scout scout_name_or_ip
ON SCOUTFrom Scout:
lumeta connections connect command-center cc_name_or_ip { command-center | scout }
(where the final parameter is the connection initiator)
| Anchor |
|---|
meraki | meraki | Meraki CLIThese commands will enable you to configure the Meraki integration via the Command-Line Interface.
- system feed list meraki
- system feed set meraki enabled [ true | false ] - Enable or Disable the Meraki integration
- system feed set meraki pollInterval posInt - Set the polling interval
- system feed set meraki key apiKey - Provide the API key to Meraki API
- system feed set meraki zone zone [ enable | disable ] - Enable integration for the indicated zone
Disabling FIPSTo disable FIPS:
- system fips disable
- system reboot