ServiceNow Integration
Asset Manager integration has passed ServiceNow's rigorous certification process and is available in the ServiceNow Store. Search for "FireMon" or "Asset Manager" to get started.
Transform your workflow with the Asset Manager Integration for ServiceNow. This robust plugin connects ServiceNow and Asset Manager, ensuring smooth and automatic synchronization of data across both platforms.
Enhance your IPAM and asset management processes, streamline operations, and achieve operational excellence. Ideal for organizations seeking a unified view of their assets and a significant reduction in manual data handling.
Key Features
-
Comprehensive Data Import: Seamlessly import detailed Asset Manager device data including IP Address, MAC, Device Type, OS, Model, Vendor, Version, AS Name, Serial Number, and DNS Name into a custom ServiceNow table for enhanced asset management.
-
Customizable Table Export: Easily export any ServiceNow tables to Asset Manager with just a single click, streamlining your data transfer process.
-
Automated and Scheduled Data Sync: Effortlessly schedule data transfers between ServiceNow and Asset Manager, ensuring up-to-date information and consistency across systems.
-
Unlock New Insights and Capabilities: Leverage synchronized data to enrich your ServiceNow data model, generate in-depth reports, and create dynamic workspaces, driving smarter decisions and streamlined operations with your newly integrated asset information.
Command Center 5.1+ required. Ingestion rate is approximately 475,000 devices per minute.
Configure the Integration
-
Generate API Key on Asset Manager Command Center
-
Open Asset Manager Command Center and go to Settings > Users.
-
Create a new user or edit an existing user to have SysAdmin privileges assigned.
-
Note: Ensure the superuser flag is enabled.
Note: Select all of the organizations you want to include in the sync.
Select the user and then select the API Key drop-down menu.
Enable and generate an API Key, or simply copy one if it already exists.
-
Point the ServiceNow Instance to the Asset Manager Command Center
-
In ServiceNow, type sys_properties in the Search bar field and press Enter.
-
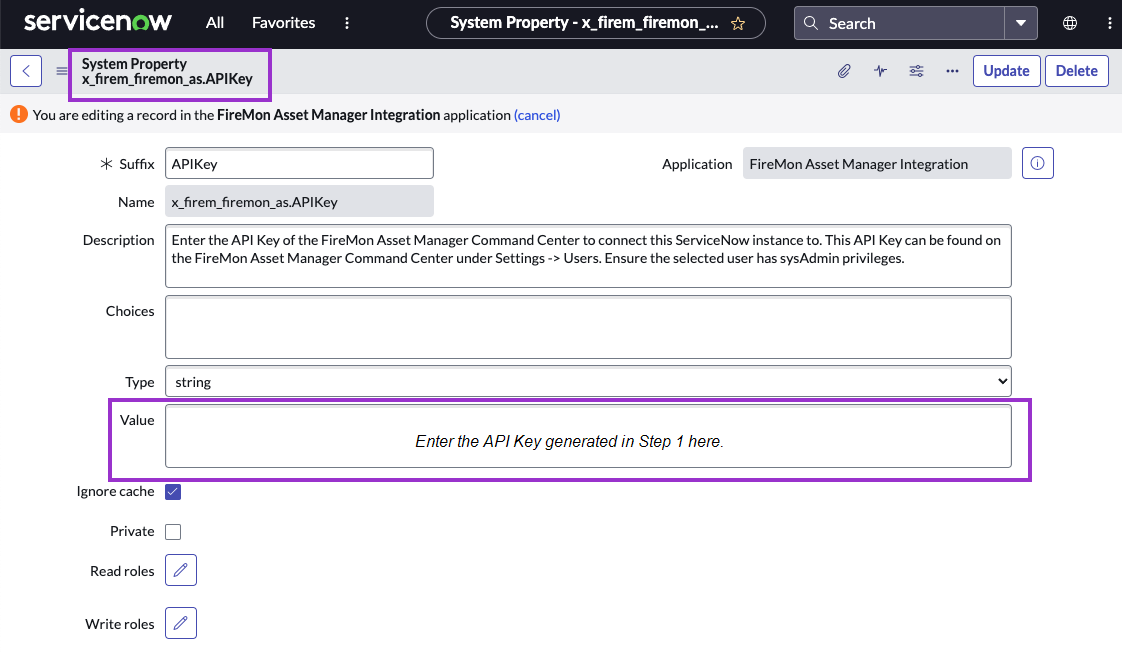
Search for the System Property named x_firem_firemon_as.APIKey and change the following:
-
Value: enter the API Key generated in Step 1
-
Leave other fields with the default values, and click Update.
-
-
Search for the System Property name x_firem_firemon_as.IP and change the following:
-
Value: enter the IP of the Asset Manager Command Center to integrate this ServiceNow instance with. Example: <127.0.0.1>
-
-
-
(Optional) Connect to a MID Server
Note: If not using a MID server, leave the value field blank.
-
Repeat Step 2 above with the following values:
-
Name: x_firem_firemon_as.midserver (case sensitive)
-
Value: enter the exact name of your configured MID Server
-
-
Note: If you are unsure of the name, it is found by navigating to Mid Server > Servers.
Navigate to MID Security Policy and set both Certificate Chain Check and Hostname Check to false for Intranet.

-
Provide ServiceNow credentials for Loopback APIs
-
In ServiceNow, navigate to Connections & Credentials > Credentials.
-
Click New.
-
Select Basic Auth Credentials.
-
In the Name field, type the case sensitive name Loopback Auth.
-
Enter your ServiceNow instance User name and password and click Submit.
-
-
(Optional) Adjust MID Server Timeout
-
Only for exceedingly large CCs (~500,000+ IPs), the devices query may take some time. For this reason, if any issues are encountered it may be necessary to increase the MID Server timeout. See: Outbound SOAP request times out at 175 seconds when going through a Mid Server - Support and Troubleshooting - Now Support Portal
-
Configure Using a Non-Admin User
Note: This is to allow read and write privileges for FireMon Asset Manager Integration related tables in ServiceNow. Only an admin can schedule the scripts, as recommended by ServiceNow. If an admin wants to allow other users to execute scheduled jobs, they must click Edit next to the Scheduled Jobs module menu option. This will allow adding roles other than admin. This is a global setting and not recommended by ServiceNow unless necessary.
-
In an admin account, navigate to Users and select a user.
-
Select the Role, and click Edit.
-
Search and add x_firem_firemon_as.asset_manager_user
-
Log in as user with new user name and password.
-
View tables.